There comes a time when you just have to say goodbye. I had a good run early on but life events got in the way and I had to suspend my writing. It has been very difficult to try to go back to creating so it is with a heavy heart that I say goodbye. However, I thank anyone that has followed me or has just happened upon my website and liked it. It has been fun, and I would like to leave you with the lyrics of a song that seems to sum up what I am feeling right now.
It is a song by Vera Lynn and it is called “We’ll Meet Again”
Let’s say goodbye with a smile, dear Just for a while dear we must part Don’t let this parting upset you I’ll not forget you, sweetheart
We’ll meet again Don’t know where Don’t know when But I know we’ll meet again some sunny day
Keep smiling through Just like you always do ‘Til the blue skies chase those dark clouds far away
And I will just say hello To the folks that you know Tell them you won’t be long They’ll be happy to know That as I saw you go You were singing this song
We’ll meet again Don’t know where Don’t know when But I know we’ll meet again some sunny day
And I will just say hello To the folks that you know Tell them you won’t be long They’ll be happy to know That as I saw you go You were singing this song
We’ll meet again Don’t know where Don’t know when But I know we’ll meet again some sunny day
Well, well, well I am still trying to finish my chicken over greens recipe (not surprising, however) but the good news is I came up with a new recipe that turned out really well and you will never miss the meat. I have always had a fascination with doing meatless or low meat recipes and it comes from when I was in Italy with the Army. When we were in the countryside and eating on the economy I noticed that the Italian cooks used meat as almost a side dish and highlighted the fresh vegetable ingredients. I am attempting to do the same with some of my dishes.
Ain’t No Chicken in Here
(Eggplant cutlets )
Gary Bechard – The Well Fed Cyclist
Ingredients –
3 – Eggplant, medium size
2 1/2 cups – Plain Panko breadcrumbs
3 cups – All purpose white flour (or, if you want to get earthy with it whole wheat)
1 cup – grated parmesan cheese
4 tbsp – Dried Italian seasoning (or 1 tbsp each of oregano, parsley, thyme, rosemary)
3 tsp – Sea Salt, coarse ground, (or to taste)
2 tsp – Black pepper, coarse ground (or to taste)
20’ish ounces – Spaghetti sauce (1 small jar)
7 to 8 slices – Mozzarella cheese (I sliced a ball of mozzarella into 1/4 in slices for my dish so they were smaller than the pre-sliced at the grocery store)
Small jar of whole Roasted Red Bell Peppers
4 – Large eggs
Extra Virgin Olive Oil
Construction Instruction –
Cutlet Breading – In a one gallon plastic bag, place the breadcrumbs, flour, parmesan, Italian seasoning, salt and pepper
Eggplant Preparation – Peel the eggplants and slice into 1/2 to 3/4 inch slices and place on a plate. You should end up with 6 to 8 slices when you are done. Next, beat the eggs and place them in a bowl or baking dish that you can use to dip the slices in and next to that dish another dish with the breadcrumb mixture. You should have a kind of assembly line thing going on.(Hint: I usually will bread three of the slices before firing up the skillet so that I can do them at the same time.) On the opposite side of the skillet I set up the baking dish (9 X 13) I will use to bake them in.
Cooking – In the large skillet cover the bottom with a light coating of olive oil and bring the pan up to heat making sure that the temperature is not too high because olive oil has a low smoke point. Pan grill the eggplant cutlets until the breading is golden brown.
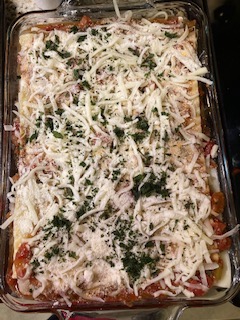
Assembly – Next place the cutlets in a single layer on a 9 X 13 baking dish where a thin layer of spaghetti sauce is on the bottom. On top each of the cutlets place the remaining spaghetti sauce and then a single layer of the roasted red bell pepper. For the last step layer the mozzarella slices on each of the cutlets. Then cover the baking dish with foil and bake at 350 degrees for 35 to 40 minutes, depending on the thickness of the cutlets.
Uses – I used this as a main dish as a replacement for the meat and served this with roasted asparagus and wild rice.
So, there I was in the middle of the jungle, no, that’s not right. Well to be honest, it was kind of a word jungle as I was trying desperately to finish the Pollo alla Griglia (grilled chicken over greens) recipe. However, there are a few ways to go with that one because many countries have their own version and I really wanted to cover all the chicken cooking methods. So while that one is still in process here is a good one while you are waiting.
Have you ever wondered just what is in frozen turkey meatballs from the grocery store? I know that I have, and even though I read the ingredient list they just do not seem right. To be honest, they just are not that good. Most of them taste like bread balls with a hint of turkey essence and maybe garlic. I wanted to go a different direction and do some simple meatballs that could be used in a variety of ways and not just in a sweet and sour sauce. With this recipe a slight adjustment to the ingredient list, such as adding some grated parmesan, turns them into Italian meatballs. There are just so many ways you could go with these.
So without any more hesitation, here’s the recipe. I hope you try these and make some creative decisions of your own! (Sorry there are no pictures but we ate them all before I could take one. I guess I will have to be faster next time.)
Enjoy! The Well Fed Cyclist – Gary Bechard
A.T.M.(’s)
(All Turkey Meatballs)
The Well Fed Cyclist – Gary Bechard
Ingredients –
2 lbs – Ground Turkey (I used 97/3 lean to fat ratio)
2 Cups – Panko breadcrumbs, not seasoned
2 tbs – Dried Parsley
2 tbs – Dried Basil
1 tsp – Garlic powder
2 tsp – fine ground black pepper
2 1/2 tsp – Kosher salt
1/2 – Small or medium Zucchini fine grated This is an important ingredient because it adds needed moisture, and some flavor, to the baking process.
Construction Instruction –
In a large bowl place ground turkey and then add, Parsley, Basil, Salt, Pepper and Garlic Powder and thoroughly combine using your hands so that the seasonings are evenly distributed. Next add the grated zucchini.
Note: for the zucchini do not use the finest grate on the grater but the next one up so that you are not eliminating the moisture from the vegetable.
Once again thoroughly combine with your hands until the zucchini is evenly distributed. At this point add the panko and go through the same process of combing the ingredients until, yup you guessed it, everything is evenly distributed
Spray a cookie sheet with non-stick spray and pre-heat the oven to 350 degrees F.
Roll the meat into balls that end up about the size of a golfball and evenly place them on the cookie sheet. Put them in the pre-heated oven and bake for 30 – 35 minutes or until the inside of the meatball is 165 degrees or, the less scientific or grandma method, they are a bit firm when you press down on them with a fork.
I used the meatballs in a sweet and sour sauce done in the crockpot and served it over rice but with some minor adjustments to the ingredient list (like adding parmesan to make Italian meatballs) the sky is the limit.
Sometimes you just have to say, “What the (insert expletive here)!” and just do the things that you enjoy doing. I came close to abandoning this blog but my friends and family said that they did not want me to. They told me that regardless of the activity at least I would be doing things that I love, writing and cooking. To that end, over the past couple of years I have been able to come up with some new recipes and I have a ton of ideas for others which I would like to share with anyone who would like them.
Every year, on Valentine’s Day for my sweetie, I make her her favorite dish which is my eggplant parmesan. This year she wanted me to also make fresh sauce to use in this dish so I decided to get a bit creative and do a twist on my smooth marinara sauce. The sauce turned out great! It had some nice deep flavors which were delicious.
Now, “Andiamo” or let’s go! I hope you enjoy.
The Twist
(A marinara with sweet subtle smoky flavors)
Gary Bechard – The Well Fed Cyclist
Ingredients –
1/3 cup – Portobello mushroom cap fine diced 1/2 – Medium or 1 small sweet onion, fine diced 1/2 – Large or 1 medium carrot peeled and grated 3 – Cloves garlic, minced 3 tbsp – Parsley, fresh, chopped 2 tbsp – Basil, fresh, chopped 1 tbsp – oregano, fresh, chopped 3 tsp – Sea Salt, coarse ground, (or to taste) 2 tsp – Black pepper, coarse ground (or to taste) 56 ounces – Tomatoes, San Marzano crushed (2, 28 oz cans) 15 ounces – Tomato sauce (1 can) 1/3 cup – Dry red wine (I used some Cabernet but you could use a Chianti or Barolo) 1/3 cup – Grated parmesan cheese Extra Virgin Olive Oil, a few good swirls around the bottom of the pan just enough to lightly coat the bottom (I used some from the Umbria region in Italy)
Construction Instruction –
Mushrooms and onions – Since this is a marinara, I did a fine dice on these trying to make sure that the mushroom and onion pieces were the same size.
Herbs – I did a regular chop on them. Or, you could use, and I am not sure every store has them, semi-dried fresh herbs you can find in the refrigerated herb section in the grocery store. They are really good and are great when you are kind of short on time. However, fresh is best.
Carrots – Everybody wonders about the carrot but in reality it is a great way to sweeten the sauce without having to resort to sugar or sugar substitutes. The carrot will disappear in the sauce and just like an old friend, they are naturally sweet.
Cooking – In a large sauce pan (I used a 5 quart enameled cast iron), coat the bottom of the pan with olive oil and bring to temperature. Note: I usually keep the temperature just below medium heat to make sure that I do not burn the oil since olive oil has a low smoke point. When the pan is at temperature, add the garlic and stir slightly to soften the garlic. Make sure that the garlic is not overcooked and does not turn brown. Next add in the onions sautéing them until they are soft and the onions turn translucent.
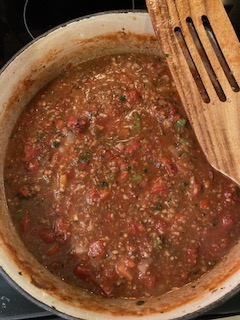
Next, add the cans of tomatoes, tomato sauce, mushrooms, grated carrot and the herbs and stir thoroughly mixing everything into an even mixture of veggies and sauce. I salted and peppered my veggies at this stage then added the wine. During the cooking process I like to take small samples to make sure that the flavors are coming together nicely.
Lower the heat and simmer for about 2 hours always making sure that you keep the sauce moving so the temperature is even throughout the mixture. Towards the middle of the simmer time add the parmesan and stir thoroughly. Simmering for this amount of time helps break down the tomatoes a bit to release their flavor. The sauce will cook down and become thicker the longer you simmer. If it the sauce looks to be too thick, I always add a bit of wine and extend the cooking time a bit.
Uses – I used this sauce in eggplant parmesan but because of its flavor it would be great with Rigatoni or thicker kinds of pasta. Bucatini would be great with this sauce. Note: I sometimes will just make a pot of sauce, let it cool and put it in plastic containers and freeze it. Stays good for up to 6 months.
It has been some time since I last posted, I even found old drafts of recipes still on this site which are mostly done but I will have to brush the cobwebs away and try and remember what in the world I was thinking at the time. However, and in good time, I will publish those too. I am sorry for my delays but motivation was really lacking for a while and creating was less of a priority. Heck, I do not even know if anybody follows me any longer. At any rate, regardless of whether there is “a following”, I am back.
I had been thinking about this particular recipe for a couple of years and had an idea of how to do it but was never able to figure out the logistics. This is a meatless recipe for a bolognese sauce and it is a decent recipe for those that need a lighter alternative to heavy meat sauces. I mean, I do like a good bolognese but having to sleep for a few days like a boa constrictor digesting his meal can be a bit, how you say, unproductive. I used this to make a nice lasagna and it turned out delicious. I hope you try it and please let me know how it turned out for you.
12 oz (weight) – Portobello mushroom caps (food processor)
1/2 – Medium onion, diced
1 – Small red bell pepper, diced
1 – Small green bell pepper, diced
3 – Cloves garlic, minced
3 tbsp – Parsley, fresh, chopped
2 tbsp – Basil, fresh, chopped
1 tbsp – oregano, fresh, chopped
3 tsp – Sea Salt, coarse ground, (or to taste)
2 tsp – Black pepper, coarse ground (or to taste)
28 ounces – Tomatoes, Petite (1 can)
28 ounces – Fire roasted tomatoes (1 can)
15 ounces – Tomato sauce (1 can)
Extra Virgin Olive Oil, a few good swirls around the bottom of the pan just enough to lightly coat the bottom
Construction Instruction –
Veggies – For the mushrooms I cubed them, put them in a food processor and pulsed about 5 times to have them have the consistency or the appearance of browned ground beef. Place mushrooms in a bowl for addition later.
Peppers and onions – I made sure to leave them a medium dice and not a super fine dice because you do not want them to disappear during the cooking process.
Herbs – I did a regular chop on them. Or, you could use, and I am not sure every store has them, semi-dried fresh herbs you can find in the refrigerated herb section in the grocery store. They are really good and are great when you are kind of short on time. However, fresh is best.
Cooking – In a large sauce pan (I used a 5 quart enameled cast iron), coat the bottom of the pan with olive oil and bring to temperature. Note: I usually keep the temperature just below medium heat to make sure that I do not burn the oil since olive oil has a low smoke point. When the pan is at temperature, add the garlic and stir slightly to soften the garlic. Make sure that the garlic is not overcooked and does not turn brown. Next add in the peppers and onions sautéing them until they are soft and the onions turn translucent. Last but not least add the mushroom mixture and mix all the ingredients together until all the ingredients are evenly distributed. I salted and peppered my veggies at this stage and took a little taste to make sure that I had the flavors right.
Next, add the cans of tomatoes and the sauce and mix everything into an even mixture of veggies and sauce. Then add the herbs and stir thoroughly. Lower the heat and simmer for about 2 hours always making sure that you keep the sauce moving so the temperature is even throughout the mixture. You want the diced tomatoes to break down a bit and release their flavor. The sauce will cook down a bit and become thicker the longer you simmer.
Uses – I used this sauce in a lasagna but because of its robust flavor it would be great with rigatoni or thicker kinds of pasta. Buchatini would be great with this sauce.
Once upon a time in a lovely oceanside village, there lived a magical gnome who liked to play with his squash, even though his mother told him that squash should never be played with because nobody should play with their food. No, not really and all kidding aside, there really is no magical gnome and playing with squash, or any food for that matter, can be fun and rewarding.
Over the past few weeks I have been playing around with the noble spaghetti squash and have been trying to find ways to prepare it that are different from what the name suggests. Everyone in the world has done a version that ends up like a spaghetti casserole with ooey gooey mozzarella cheese and a jar of spaghetti sauce mixed in, baked and browned. Yes, I have done the squash in the traditional way and yes it turned out well but it was a “been there done that” kind of thing. In addition, I did an Asian version where I prepared the squash took out the “noodles” and did a quick pan fry adding them to a stir fry of chicken, zucchini, carrots, yellow squash, assorted peppers to act as noodles. I may post the Asian version at another time but I am most excited about my Spanish version.
This recipe is not complicated but you will need some time to allow the flavors of the Spanish Sofrito sauce to come together (about 30 minutes) but you can start the sauce when you put the spaghetti squash in the oven to bake so that will shorten the overall time you spend cooking. So without further delay, here is the recipe.
La Calabaza Gnomo (Gnome Squash)
Ingredients –
Spaghetti Squash – Medium 1/2 Medium Sweet Onion – diced fine 1/2 Poblano Pepper – diced fine 1/2 Green Pepper – diced fine 1/3 cup Carrots – peeled, diced fine 3 cloves Garlic – minced 3 ounces uncured Pancetta – diced 28 ounce can crushed fire roasted tomatoes 15 ounce can tomato sauce, plain, no salt 1/4(‘ish) teaspoon sweet paprika 3 Bay leaves Extra Virgin Olive Oil Salt – to taste (a few grinds from a salt mill) Pepper – to taste (a few grinds from a pepper mill) Lemon Juice – A squirt or half a lemon juiced
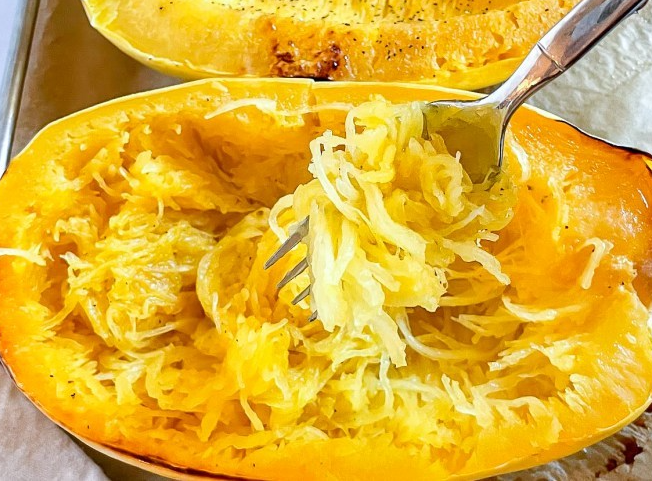
Construction Instruction – Squash – First take the squash wash the outside and cut off the ends, just the stem and flower parts, making sure that you retain parts of each end. Cut the squash in half the long way. Note: you will notice that the squash is kind of shaped like a football or rugby ball so it will be easy to figure out the long way. Turn the halves over and scoop out the seeds. Next, rub the inside of the squash with Extra Virgin Olive Oil and salt and pepper to taste. Take out a cookie sheet, line with parchment paper and place the squash flat side down. Make sure you poke some holes through the skin on the outside of the squash to release some steam and pressure during the cooking process. Place the squash in an oven that has been preheated to 425 degrees and bake for 40 minutes. After the squash is done, take it out of the oven and set aside for it to cool before taking out the spaghetti squash strands. When cool enough to handle, take a fork and scrape strands of squash and place in a bowl for later.
Noodle-riffic!
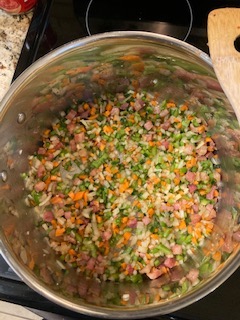
Sauce – While the squash is doing its thing in the oven, in a large sauce pot, drizzle a small amount of Extra Virgin Olive Oil in the bottom and bring up to temperature. Reminder: Olive oil has a low smoke point so make sure to use a lower heat (just below medium) so as to not burn the oil. Take the diced pancetta and place in the bottom and keep it moving so you can render all that fatty goodness from the pancetta. Once the pancetta is done, add the garlic, onions and peppers and sautee them until the onions are translucent and the peppers a bit soft (normally around 2 to 4 minutes). Next, add the carrots and keep them moving as well until just a bit tender (another 2 to 4 minutes). Once everything seems like it is coming together add in the fire roasted tomatoes and the can of tomato sauce. Mix everything together so all the ingredients are evenly distributed, add the paprika, bay leaves and lemon juice, give it a good stir so that all the good things come together. Kind of think of it as a party where everyone needs to mingle and get to know each other. Reduce the heat to low and simmer for 25 to 30 minutes making sure that you continue to stir. This evens out the temperature of the mixture in the pot and prevents scorching the bottom of the sauce.
This is what the mixture looks like before you add the tomato sauces
Combination – Take the noodles that were set aside add them to a large skillet, remove the bay leaves from the sauce, then add enough sauce to cover the noodles and fold everything together so that all the noodles are coated with sauce. I warm everything up for around 5 to ten minutes over medium low heat. Then…Serve! I did a side of arugula salad with cherry tomatoes and a very light vinaigrette dressing.
If you have leftovers, you can do what I did which was put them in a small baking dish sprinkled shredded sharp cheddar and colby jack cheese to bake for a nice little casserole side. (you can do this by preheating the oven to 300 degrees and bake until bubbly around the sides and the cheese has melted)
Honestly, I never thought this day would come. After my wife’s cancer, covid and a holy host of other roadblocks, I really believed that I was just going to end the blog. However, I am finally at the point where I can create a recipe and folks will actually be able to taste the flavors plus I am transitioning to semi retirement which will give me more time to do things that I want to do like creating and writing.
A couple of weeks ago, I was in Ireland for my daughter’s wedding and we had a great time. The scenery was breathtaking and, I will say that, from a food perspective, it was eye opening. I am not sure what I was expecting regarding the pub and restaurant food except maybe heavy meat dishes with tough cuts of meat and no variety. I guess I had Charles Dickens in my head or maybe the Irish potato famine but my oh my! I was so wrong! Every place we ate had their own greenhouse behind the restaurant with fresh herbs and vegetables and the food was diverse and very, very tasty. The dairy products were sublime and the number of tasty chowders and soups was almost immeasurable. I can honestly say that I did not have a bad meal while I was in Ireland. Their food scene is highly underrated and is worth the trip. One of the things I had was a version of pearled couscous I thought was very tasty. Their version leaned toward an Italian flavor profile so I decided to see if I could create my own version of this same dish. Mine is “smokier” in flavor with some subtle notes of sweetness from the onion. I used this as a base for pan seared shrimp and asparagus and it was very tasty. Enough of this intro stuff and on to the recipe.
Hey Pearl!
Pearled CousCous with diced tomatoes (and other goodies) Serves 4
1 cup – Pearled couscous (yield is 2 cups cooked)
2 cloves – garlic (minced)
1/3 cup – fine diced sweet onion
14.5 ounce can – fire roasted diced tomatoes
8 ounce can – tomato sauce
1 tsp – salt
1 1/2 tbsp – capers
7 – basil leaves chopped
1/2 tsp – course ground pepper
Extra Virgin olive oil (a couple of good turns)
Construction Instruction –
Couscous – Prepare couscous according to package instructions but stay to the shorter cooking time because these are going to be added to and heated in the sauce for a few minutes. After preparing, take off the heat and set aside. (normal cooking time for the brand that I used is 10 minutes but I stopped at the eight minute mark)
Sauce – This is a quick sauce so it will only take around 10 to 15 minutes to prepare. In a 3 quart sauce pan drizzle some olive oil (a couple of good turns) and bring to temperature making sure that you do not burn the oil. Note: olive oil has a low smoke point so stove surface temperatures should be slightly below the mid-point. Once the oil is hot, add the garlic and onion and sweat them until the onion is translucent and tender. Reduce the heat and then add the diced tomatoes and the tomato sauce and stir to bring all the components together. Simmer for about 3 to 4 minutes, then add in the capers, basil leaves, salt and pepper, all to taste. Simmer the sauce for another 4 to 5 minutes so the flavors can get to know each other.
Finale – Once the sauce is done, add in the cooked couscous and gently fold together until everything is combined evenly. Keep over low heat and you will be ready to serve.
I used this as a base for pan sautéed shrimp with steamed asparagus.
Wondering how to start back to writing when so much has happened over the past year is a daunting task. Thankfully, my wife’s cancer is in full remission after a stem cell transplant. I am very grateful that she is still here. She, in fact, is the one that encouraged me to get back to my creative self and publish more often. As usual, I procrastinated to the Nth degree but here I am and I am going to try and make another go of it. I have done a few things in the cooking realm over the past year but having a person on chemotherapy every dinner becomes like an episode of “Chopped” or “Guy’s Grocery Games” as you never know what they are going to be able to eat. You have to ask the questions, “what do you feel like eating?”, “what flavors would taste good to you?”, “are there any food textures that bug you?”, etc. and then create from there. Sometimes the default becomes Chicken McNuggets with the only question left to answer is “what kind of sauce do you want with that?”. There are some things I would like to try in the upcoming year like, Ricotta gnocchi, more vegetarian dishes (I have still not conquered tofu), twists on some of my older recipes and sauces. I know that the are a few people that follow this blog hoping that I will put out something good or at least mildly palatable and I will try not to disappoint them but 2020 wore me out as it did many people. Please stay tuned and I will try to do something wonderful.
One of the things that I have figured out is that life is best taken one day at a time. There are things that happen that will flat out leave you wondering what in the world you did in your past lives to deserve what you are getting now. Currently, my wife has stage 3 lymphoma and we are having to deal with the issues and circumstances surrounding the disease. Thankfully, my wife is one of the most positive people on the freakin’ planet and that bodes well for her treatment. I applaud her and her positive fighting spirit. However, cancer changes things and her taste for food is one of those. I guess I do not understand her current penchant for wanting a Chicken Nugget meal from McDonalds at random moments but it is not only that which has changed. Her tastes change on a daily basis. No I don’t mean that she wants to dress like it is the 80’s (ewww!) but because of the Chemo drugs she may favor certain flavors over others. This has created a situation where I am literally buying for every dinner every day based on what flavor profile she prefers. I have to ask each day, do you want salty, sweet, savory, sour, spicy, etc. The days of grocery shopping for the week have disappeared. It is almost like performing an episode of “Chopped” every night. This recipe was born out of this situation.
Last night I needed something to go with chicken parmesan and grilled eggplant but did not want to do the noodle thing (chemo drives up the sugar content in the blood and noodles are bad for that) which would be bad for the blood sugars. Rice was the winner in this contest because of having zero sugars thus not contributing to the possible diabetic issues. Normally I use all fresh ingredients and cook all day but I wanted to keep it simple and use as many pre-done products as possible to cut down on prep and clean up time. I also wanted it to be flavorful so I kind of combined Northern Italian with Southern Italian to get there. You will notice the name is a bit different and references the type of cancer my wife has and it is not intended to glorify the disease but without Dr Hodgkins there would be no treatment. So, I guess it could be a tribute to him.
Hodgie’s Italian Baked Rice
Ingredients –
1 – 14.5 ounce can of diced tomatoes with garlic, oregano and basil (I used Hunt’s) drained
1 – 8 ounce can of tomato sauce with garlic, oregano and basil (I used Hunt’s)
2 – 8.8 ounce bags of 90 second rice (I used Uncle Ben’s)
1/3 cup – Diced mushrooms (I used baby Portobellos)
1/3 cup – Diced sweet onion
1/4 – Red bell pepper diced
1/4 – Green bell pepper diced
4 ounces – Shaved parmigiano-reggiano cheese
Extra Virgin Olive Oil – You know…the good stuff
Construction Instruction –
First, you are going to make a quick sauce. In a 5 quart sauce pan do a couple of turns around the bottom of the pan with the olive oil and bring to temperature remembering that olive oil has a low smoke point. ( medium to medium high should about do it). When the pan is at temperature put in the onions and peppers and sautee them until the onions are translucent (you can kind of see through them). Next, add the diced mushrooms and sautee them until they soften. When the vegetables are done add the diced tomatoes and the tomato sauce, lower the heat and simmer for about 15 minutes.
Second, do the 90 second rice according to the package directions and put into a big bowl. Add your quick sauce to the rice and fold everything together until the vegetables are evenly distributed. Place this mixture in a small baking dish and gently layer the parmigiano-reggiano on the top.
Finally, bake covered at 350 degrees for about 30 to 35 minutes.
This was served as a side for Chicken Parmesan and grilled eggplant but would be great with a host of other dishes.
A final note –
You can make this a fancier dish if you use your own homemade sauce, fresh herbs and roast your own tomato pieces but if you are pressed for time and need to just make dinner happen, here you go.
I know that there are a lot of ways to go about reverse engineering a recipe and one of my favorite ways is to take a bit of something and gently deconstruct the different flavors while the food is in my mouth. The only recipe I have still yet to reverse engineer is the Vietnamese Pho from Pho Van in the Strip District in Pittsburgh, Pennsylvania (If you are ever in Pittsburgh it is well worth the trip. Your mouth and tummy will thank you.). Their flavors were sublime and extraordinarily complex. However, I digress, and I need to get back to today’s recipe.
There I was having some Chinese takeout from a very respectable place down here in South Carolina and I was trying to do the flavor deconstruction thing with the Cashew Chicken that I was eating. The flavors that I was experiencing were good. They had great fresh ingredients and the sauce was very good but I could not help but see how it resembled barbecue sauce. The flavors I was experiencing had all the major players for cashew chicken, ginger, soy sauce, sesame oil, a hint of lemon grass, some garlic and hoisin sauce (I believe) but I kept thinking that I could do the sauce more simply. I wanted to have this recipe so that you would be able to do it on a week-night without any trouble. As anyone who reads this Blog knows, I am a person that violates my mother’s rule of “Don’t play with your food” and I did. I was able to substitute a commercially available (albeit high quality) sauce to get the same flavors I was experiencing in the restaurant sauce. One day maybe I will try my hand at making my own sauce for cashew chicken but for now, the recipe below is my twist. It turned out great! I hope you try it and let me know how yours turned out.
My Way – Cashew Chicken
Gary Bechard – The Well Fed Cyclist
Serves 4 – 6
Ingredients –
1 lb – Chicken tenderloins, cut into 1 inch cubes
1 – Zucchini, medium size, cut into bite size pieces
1/2 – Red bell pepper, heavy diced (should be about 4 ounces)
1/2 – Green bell pepper heavy diced (should be about 4 ounces)
1/2 – Large sweet onion, heavy diced (should be about 4 ounces)
6 oz – Carrots, sliced (not too thick because they will be too crispy, not too thin because they will disappear in the cooking process)
2 – Broccoli crowns, cut into bite size pieces
4 oz – Mushrooms, sliced
4 to 6 oz – Cashews, lightly salted
1 tsp – Coarse ground, sea salt
1 tsp – Coarse ground black pepper
1 tsp – Ground ginger
10 0z – Sweet Baby Ray’s Hawaiian Barbecue Sauce (so I cheated a bit on the sauce)
3 to 4 tbsp. – Canola oil or peanut oil (A couple of good turns around the each of the pans will do great)
Construction Instruction (Chicken) –
In a large skillet, do a couple of good turns around the bottom of the pan with the canola (or peanut oil) and bring up to heat. When the oil is at temperature, put in the cubed chicken and cook like you would in a stir-fry. While the meat is cooking, season with salt, pepper and ginger remembering not to over season. When the meat is done remove it to a separate bowl to wait on the vegetables.
Construction Instruction (Vegetables) –
In a larger skillet (this will have to hold all of the ingredients at the end), do a couple of good turns around the bottom of the pan with the canola (or peanut oil) and bring up to heat. When the oil is at temperature, put in the onions, peppers, carrots, cashews, and begin to cook like you would in a stir-fry. Season the vegetables lightly with salt pepper and ginger. Note: I always do my vegetables going from hard to soft. As these vegetables begin to soften a bit, add in the zucchini, broccoli and finally the mushrooms. The idea for the vegetables is to not allow them get too soft, as you will want them to retain a bit of their crunchy texture. Construction Instruction (The Finale)
Take your chicken and add this to the vegetable mixture and combine thoroughly. To this mixture, add the Sweet Baby Ray’s Hawaiian barbecue sauce and make sure that all the elements have been coated well. Over low heat, bring the mixture up to serving temperature.