We ALL want alternatives…(sometimes)

Once upon a time in a lovely oceanside village, there lived a magical gnome who liked to play with his squash, even though his mother told him that squash should never be played with because nobody should play with their food. No, not really and all kidding aside, there really is no magical gnome and playing with squash, or any food for that matter, can be fun and rewarding.

Over the past few weeks I have been playing around with the noble spaghetti squash and have been trying to find ways to prepare it that are different from what the name suggests. Everyone in the world has done a version that ends up like a spaghetti casserole with ooey gooey mozzarella cheese and a jar of spaghetti sauce mixed in, baked and browned. Yes, I have done the squash in the traditional way and yes it turned out well but it was a “been there done that” kind of thing. In addition, I did an Asian version where I prepared the squash took out the “noodles” and did a quick pan fry adding them to a stir fry of chicken, zucchini, carrots, yellow squash, assorted peppers to act as noodles. I may post the Asian version at another time but I am most excited about my Spanish version.

This recipe is not complicated but you will need some time to allow the flavors of the Spanish Sofrito sauce to come together (about 30 minutes) but you can start the sauce when you put the spaghetti squash in the oven to bake so that will shorten the overall time you spend cooking. So without further delay, here is the recipe.

La Calabaza Gnomo (Gnome Squash)

Ingredients –

Spaghetti Squash – Medium
1/2 Medium Sweet Onion – diced fine
1/2 Poblano Pepper – diced fine
1/2 Green Pepper – diced fine
1/3 cup Carrots – peeled, diced fine
3 cloves Garlic – minced
3 ounces uncured Pancetta – diced
28 ounce can crushed fire roasted tomatoes
15 ounce can tomato sauce, plain, no salt
1/4(‘ish) teaspoon sweet paprika
3 Bay leaves
Extra Virgin Olive Oil
Salt – to taste (a few grinds from a salt mill)
Pepper – to taste (a few grinds from a pepper mill)
Lemon Juice – A squirt or half a lemon juiced

Construction Instruction –
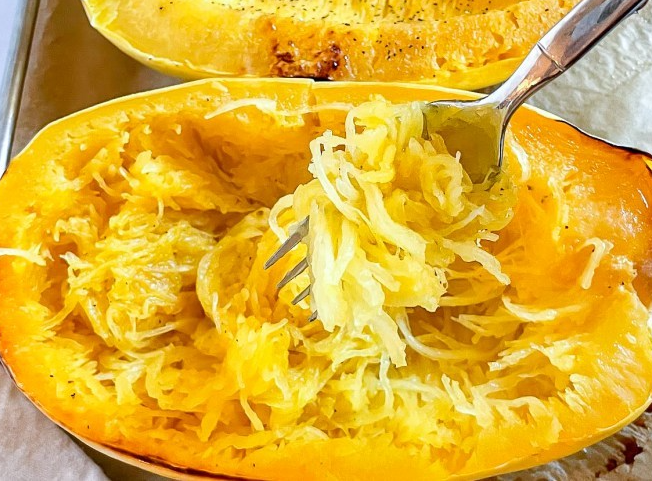
Squash – First take the squash wash the outside and cut off the ends, just the stem and flower parts, making sure that you retain parts of each end. Cut the squash in half the long way. Note: you will notice that the squash is kind of shaped like a football or rugby ball so it will be easy to figure out the long way. Turn the halves over and scoop out the seeds. Next, rub the inside of the squash with Extra Virgin Olive Oil and salt and pepper to taste. Take out a cookie sheet, line with parchment paper and place the squash flat side down. Make sure you poke some holes through the skin on the outside of the squash to release some steam and pressure during the cooking process. Place the squash in an oven that has been preheated to 425 degrees and bake for 40 minutes. After the squash is done, take it out of the oven and set aside for it to cool before taking out the spaghetti squash strands. When cool enough to handle, take a fork and scrape strands of squash and place in a bowl for later.

Noodle-riffic!

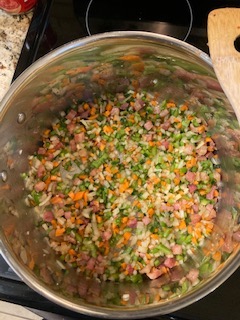
Sauce – While the squash is doing its thing in the oven, in a large sauce pot, drizzle a small amount of Extra Virgin Olive Oil in the bottom and bring up to temperature. Reminder: Olive oil has a low smoke point so make sure to use a lower heat (just below medium) so as to not burn the oil. Take the diced pancetta and place in the bottom and keep it moving so you can render all that fatty goodness from the pancetta. Once the pancetta is done, add the garlic, onions and peppers and sautee them until the onions are translucent and the peppers a bit soft (normally around 2 to 4 minutes). Next, add the carrots and keep them moving as well until just a bit tender (another 2 to 4 minutes). Once everything seems like it is coming together add in the fire roasted tomatoes and the can of tomato sauce. Mix everything together so all the ingredients are evenly distributed, add the paprika, bay leaves and lemon juice, give it a good stir so that all the good things come together. Kind of think of it as a party where everyone needs to mingle and get to know each other. Reduce the heat to low and simmer for 25 to 30 minutes making sure that you continue to stir. This evens out the temperature of the mixture in the pot and prevents scorching the bottom of the sauce.

This is what the mixture looks like before you add the tomato sauces

Combination – Take the noodles that were set aside add them to a large skillet, remove the bay leaves from the sauce, then add enough sauce to cover the noodles and fold everything together so that all the noodles are coated with sauce. I warm everything up for around 5 to ten minutes over medium low heat. Then…Serve! I did a side of arugula salad with cherry tomatoes and a very light vinaigrette dressing.

If you have leftovers, you can do what I did which was put them in a small baking dish sprinkled shredded sharp cheddar and colby jack cheese to bake for a nice little casserole side. (you can do this by preheating the oven to 300 degrees and bake until bubbly around the sides and the cheese has melted)

Enjoy!
The Well Fed Cyclist
Gary Bechard

Everyone needs a quest…

First, I have to apologize for not posting last week.  I was not prepared as I had too many recipes which had not been converted to electronic format and the food notebook is well, for lack of better words, something that looks like the rants and scribblings of a lunatic.  The notes do not translate well (kind of like seeing Swahili for the first time) and are not electronic.

Now I believe that everyone needs a quest or something to strive for.  Is it wrong that my current culinary quest is to stuff  everything in the cabbage family?  I have been looking at Savoy cabbage for quite some time, not in an inappropriate way mind you, and have been wondering with what I could possibly stuff it. I wanted to have something lighter than regular stuffed cabbage which leaves you with that, I don’t know, feeling that you just ate a bowling ball. I decided on chicken because the boneless – skinless breasts take on flavors well and are easy to work with and frankly, I have already done the “shrimp thing”.  Finally, I cannot lay claim to thinking of the Frank’s Sweet chili sauce as a topper for these beauties because my wife came up with the idea during her heating them up for lunch the next day.  Without further delay, here is the recipe.  Mind you, this recipe is a bit labor intensive but so very worth the effort. I shared this with some of the ladies at work and they loved them!

Putting on the Savoy

(Chicken stuffed Savoy cabbage)

(Serves 4-6)

The Well Fed Cyclist – Gary Bechard

Ingredients:

2 – Chicken breasts, boneless – skinless, baked, shredded and fine diced (I went ahead and did 3 with one of them becoming an awesome chicken sandwich the next day)

1 1/2 cups – Basmati rice, about 4 servings (I used Uncle Ben’s for simplicity) prepared according to package instructions.

1 – Small head of Savoy cabbage

1/3 cup – Green onions, chopped (Stuffing mixture)

1/3 cup – Mushrooms, fine chopped, I used cremini mushrooms (baby portabellas) (Stuffing mixture)

For the roasting of the chicken:

1 tsp – Kosher salt

1 tsp – Coarse ground black pepper

1/2 tsp – Smoked paprika

6 sprigs – Thyme leaves

1 tbsp – Rosemary leaves, fine chopped

1/4 cup – Chicken stock

Preparation – Take the chicken breasts and place in a small baking dish in which you have put the chicken stock, season with the salt, pepper, smoked paprika, thyme and rosemary. Bake them at 350 degrees for about 35 to 40 minutes or until they are done (internal temperature 165 to 170 degrees) and set aside to cool. Note: you can always do the chicken a day ahead if you would like to cut down on preparation time on the day you are stuffing the cabbage.

While the chicken is doing its thing in the oven, core the cabbage head by taking a 3 to 4 inch deep cone around the stem of the cabbage. The cone should be about the same length as a good paring knife. Place the cabbage head in water topside down and boil for about 35 minutes (nifty it is the same amount of time as the baking time on the chicken, eh?) or until the leaves begin to soften. Once the cabbage head is done, take and set in a colander to drain and cool.

Construction Instruction

Rice – I used Uncle Ben’s rice because it is easy and only takes 10 minutes. Cook the rice according to the package directions drain well and set aside.

Stuffing Mixture – Take your chicken and fork shred and fine dice and toss into a very large bowl. Next add, cooked rice, green onions and mushrooms. Now you are ready to fold everything together until all the ingredients are thoroughly combined.


Creating the stuffed leaves – First, make your “production line” in a pretty large working area of the kitchen with the colander that contains the cabbage, then the stuffing bowl, a large flat plate on which to stuff and fold the cabbage leaves then your baking dish. In the baking dish (a deep 9” X 13”) or similar dish (the one that I use is about 2 ½ “ to 3” deep) put about a ¼ inch (about a 1/3 cup) of chicken or mushroom stock in the bottom to keep the leaves moist during the baking process. Working from the outside of the cabbage head take a leaf and place on the plate with stem side toward you, spoon about a couple of tablespoons worth of the mixture in the center. The amount of mixture will vary with the size of the leaves.Then, take the stem side and fold over top of the mixture so that the end is at the edge of the pile of mixture, next, fold each side to the center and finally take the far end and fold toward you. Take the completed packet and place with the smooth side up in the baking dish. Repeat, this process until you have a layer of packets along the bottom of the baking dish. Cover the baking dish with aluminum foil. Pre-heat the oven to 350 degrees and bake for 35 to 40 minutes.


Plating – I plated these 2 to 3 per person and allow each person to put the amount of Frank’s brand sweet chili sauce they desire on top. I served this with a double helping of stir-fried vegetables.


Enjoy!

The Well Fed Cyclist


The best thing I ever ate (and other fantasies)

This is an old blog post that I thought would go nicely with the upcoming cooler weather (such is Western Pennsylvania, you know, the four seasons? Waiting for winter; winter;  more winter and road construction)  I cannot lay claim to creating the four season’s description because I heard them somewhere in Maine actually. This recipe turned out very well and is replay worthy.  It was done at a time when I was unemployed and still in North Carolina. So, on with the show!

Tuesday, September 18, 2012

I know, I know, I am unemployed and am supposed to have all this time on my hands and I should be cranking out the recipes at a breakneck pace, writing the cookbook, discussing my next Food Network gig and becoming a “Food Star” extraordinaire but…that just ain’t happenin’. However, I will be more conscientious in making more posts because I have the job hunting machine up and running and it will need less of my time and I can devote more time to writing and creating.

Ah the human condition, it is such that since time immemorial we have sought out those things that bring us gastronomic pleasure. Whether it was the mastodon steak so prized by our Neanderthal ancestors (or other related hominid) or the chicken and dumplings that my Mere Mere did when I was a young lad, we all, or at least most of us, try to find those things that delight our palates and soothe our inner food souls.  We all remember a couple of types of dishes, the ones that are so over the top with flavour and stick out in our minds as exceptional and those, kind of like C-rations in the Army, that, well…kind of suck. As any followers of this blog know, I try to post things that are relatively easy to make with complimentary flavours to hopefully bring joy to the palate. In this vein, my son’s girlfriend, the lovely and talented Jess, honored me by paying me the compliment, “it was possibly the best thing I ever ate” and, “the fresh pineapple takes the flavours to the next level,”on the following recipe.  I wanted to share this recipe here today, late (as always), but here. I will be posting some other recipes this week, but this one is a jewel.

So there I was staring at the produce in the grocery store when the leeks started to speak to me.  It is not that I normally listen to vegetables but the leeks were very insistent that I use them in a recipe. (I really am not crazy or at least in my mind anyway) but after a relentless whispered discussion, I was seduced by my slender, green, onionesque, beauties. Having only used them for a soup stock and my Vietjapthainese Pho recipe, I was wondering how I was going to use them. I mean, I had not even picked out the protein for the dinner yet. How could I have been so impulsive to pick up a vegetable that I had yet to figure out with what I was going to use it?  Suddenly, I spied a sign, not that kind of sign silly, as no deity was involved in pointing out what I was to use for this meal…there was only talking vegetables, it was the “pineapples are on sale” sign. Into the basket the fresh pineapple went, then the mushrooms and some celery and finally, I chose a pork tenderloin as the protein for this meal. I named this recipe “The Happy Hurdler” and Jess you did a fine job getting over those hurdles. Without further adieu, here is the recipe.

The Happy Hurdler

Pork Tenderloin

(Serves 6)

Ingredients:

2.6 to 3.0 lbs – Pork tenderloin (should come in two pieces)

2 – Leeks thoroughly washed and dried (they tend to be a bit dirty)

1 pint – mushrooms (I used mixed mushrooms with shitake, creminis, portabello and others)

2 to 3 cups – Mushroom broth

½ tbsp – Ground ginger

½ tbsp – Ground nutmeg

½ tbsp – Coarse ground black pepper

1 – Pineapple, fresh, cored, quartered, and sliced thin

3 tbsp – Soy sauce (I use the light sodium version) Note: this amount is approximate as I just make a drizzle of soy sauce down the center of each tenderloin piece while in the baking dish.

Preparation – Take the leeks and cut the leaves right at where the green turns to white. Wash the leaves thoroughly as there will be quite a bit of dirt in there. On the end of the white part there will be root looking things and you need to cut those off and slice the white part very thin.  You should end up with what look like tiny onion slices. Put these in a bowl and set aside. Next make sure the mushrooms are all good and that most of the dirt has been brushed off.  Now for the pineapple, core and quarter and cut into ¼ inch slices. What you should end up with is a bunch of pineapple triangles.

Construction Instruction – In a deep 9” X 13” baking dish or similar dish (the one that I use is about 2 ½ “ to 3” deep) layer the leek leaves in the bottom creating a bed for the pork tenderloin. (the fluffier the better by the way) next lay the tenderloin halves on top of the bed side by side (kind of a Lucy and Ricky Ricardo thing). Next, take the mushroom broth and pour it over the pork. Then take and drizzle the soy sauce over each tenderloin followed by dusting each with the ginger, nutmeg, and black pepper. Using your “little onion rings), position them so that they are on each of the pork pieces with any leftovers put on to the leek bed. Next, take the mushrooms and also put them on the bed of leeks in and around the pork tenderloins. Now for the fun part, taking the pineapple slice triangles you have made layer them on top of the tenderloins using a slight overlap, making what looks like pineapple armor. All that is left is to put this in the oven at 325 degrees and bake, low and slow, until the internal temperature is at least 150 degrees.

I served this with steamed fresh broccoli with a bit of lemon pepper and baked rosemary and thyme baby red potatoes (limit the serving size of this to make sure carbs are in line).

Enjoy!

The Well Fed Cyclist

You stuffed what?! With What?!

Ever have a “Rock Star” moment? I actually had two in my last trip to the grocery store and was as giddy as a school girl when I got home because they do not happen that often (or often enough if you ask me). The first one was after I first picked out my Bok Choy cabbage heads. A lady walked up and asked me what type of greens they were and as I started explaining about 3 more ladies came up and started listening. I began to explain what I was going to do with them and told them that I had a food blog and that a recipe was going to be out there shortly.  They all pulled out paper and wrote down the address.  I felt kind of cool at that point. The second moment was while I was trying to find green onions for the stuffing mixture. A nice lady was standing there holding some wet broccoli, I happened to have a bag and let her use it because I did not see the green onions. She then told me that she had been standing there in front of them all the time and I told her what they were for. As I explained how I was going to make the stuffing, she nodded her head and it looked like she thought it was going to be pretty tasty. I told her I had a food blog and that I was going to put the recipe out there in a couple of days and SHE pulled out some paper and got the web address. I then felt really, really cool and even though I do not have a large number of followers at least it seemed like people were interested and they thought the food would taste good. I guess that is pretty sad that I think these encounters were “Rock Star”moments but I guess it is all in one’s perception. For me, I felt pretty good. Well, enough of that stuff and on to the recipe.

For many a week now, since the beginning of what should have been spring but has turned out to be a short stretch of “interesting” (in the Chinese curse sort of way) weather, I have been staring at the baby Bok Choy in the grocery store, not in an inappropriate way, mind you, and it is not that I believed that they were going to speak to me, like many vegetables have in the past but I always thought that I would be able to do something interesting with them in the kitchen but what? During my past visit to the store, I turned my attention to the mature Bok Choy to see what they had to offer saw those long luscious leaves and my mind started racing to see what I could come up with to use this vegetable.  Because the weather has been so cool lately it was reminding me of a stuffed cabbage dish that originated in Poland, Hungary and what was the East Bloc nations from the days of the USSR, called gwumpkies.  These are regular cabbage leaves stuffed with a mixture of either ground beef, pork or a combination of meats with rice. They are a pretty hearty meal and a nice comfort food for winter but really not suitable for the spring or summer because they are so heavy. So to that end, I really did not want to use any of the heavy meats because of the fat content and the tendency to make you want to hibernate or drink copious amounts of vodka so I began looking at the turkey and chickens of the world. Although, turkey and chicken were lighter, lots of people stuff Bok Choy with the ground version of the fowls so I turned my attention to the seafood I would normally eat in the summer. Crab was the first thought but was too damn expensive. The tunas, salmons and heaven forbid, Tilapia’s did not really appeal to me so I thought, shrimp!  And, that was the answer so a recipe was born. Bok Choy is used in a host of Asian dishes and I remember some Korean soldiers whose wives made Kimchee (pickled cabbage and onions) with it but I wanted something different and decided on stuffing the leaves.  My thoughts wandered to how to prepare the shrimp and I thought I would get the best flavor by roasting, as opposed to boiling, the shrimp. The dish is constructed in much the same way as gwumpkies and turned out amazing. (All of my test subjects loved them.) So without further adieu here is the recipe

This Ain’t no Ploy,

(Shrimp stuffed Bok Choy)

(Serves 4-6)

The Well Fed Cyclist

Gary Bechard

Ingredients:

2.0 lbs – Shrimp, 51 to 60 count, shelled and de-veined

1 1/2 cups – Jasmine rice, (I used Minute Rice for simplicity)

15 to 16 – Large Bok Choy leaves (You can count on getting 2 to 3 heads of Bok Choy, I just count the leaves while I am in the store before I head out)

1 cup – Green onions, chopped (Stuffing mixture)

1/3 cup – Mushrooms, fine chopped (Stuffing mixture)

¼ cup – Slivered almonds, chopped fine (Stuffing mixture)

1 – Celery stalk, (relatively large), fine diced (Stuffing mixture)

3/4 tsp – Ground ginger, (Shrimp coating)

2 tsp – Toasted sesame seed, (Shrimp coating)

1 tbsp – Coarse ground black pepper (Shrimp coating)

2 tbsp – Soy sauce (I use the light, low sodium version) (Shrimp coating)

¼ cup  – Peanut oil, (Shrimp coating)

1 tbsp – Toasted sesame oil, (Shrimp coating)

6 to 8 cups – Mushroom broth, (4 to 5 in which you will boil the rice and the rest will be for wilting the Bok Choy leaves)

¼ to ½ cup – Chicken stock (or mushroom broth) for the bottom of the baking dish

Frank’s Red Hot, Sweet Chili sauce (Thick) or Thai Sirracha chili sauce (for those who like a bit more spice in their life)

Preparation – Take the leaves off the Bok Choy by cutting them, or pulling them, off the bottom like you would a lettuce leaf. Wash each of the leaves thoroughly as there will be quite a bit of dirt in there and separate in a dish according to size (This will make more sense later). On the end of the white part cut off the end of the stem pretty close to where the green begins on the Bok Choy leaf and toss (or make a necklace, it is entirely up to you).  However, you will need a little bit of the stem when you are wilting the leaves. I also do the chopping first and place the ingredients in the refrigerator so that it saves time later.

Construction Instruction –

Shrimp Marinade and Roasting – In a large bowl, combine peanut oil, toasted sesame oil, soy sauce, toasted sesame seeds, ground ginger, and black pepper and whisk together until completely combined. Next, make sure the shrimp are defrosted (if you use frozen “fresh”) and toss them into the bowl with the marinade. Using your hands (it is really not that bad, come on) kind of toss the shrimp making sure that each has an equal amount of coating and spread these in a single layer on a large cookie sheet.  There is no need to coat with non-stick spray because the shrimp are already oiled (just like getting them ready to get a suntan).  Pre-heat the oven to 400 degrees, and roast the shrimp from 10 to 20 minutes or until they become firm making sure to flip them half way through the process. Set these aside and let them cool for a bit. Keep the cookie sheet out because you will want to have the oils and seasonings that are leftover for the mixture.

Rice – I use Minute rice because it is easy. Cook the rice according to the package directions in 4 to 5 cups of the mushroom broth, drain well and set aside.

Stuffing Mixture – Take your semi-cooled shrimp and toss those puppies into a food processor and pulse several times until the shrimp’s texture looks like cooked ground turkey.  Note: I use a small processor, small batches and very short pulses so that I do not liquidate the shrimp. When the pulsing is complete, put shrimp in a large bowl and add, cooked rice, green onions, mushrooms, almonds, and celery. Next, add the leftover oils and seasonings from the shrimp roasting and fold everything together until all the ingredients are thoroughly combined.

Creating the stuffed leaves – First, make your “production line”, you will need a large shallow skillet, a pretty large working area and your baking dish.  In the baking dish (a deep 9” X 13”) or similar dish (the one that I use is about 2 ½ “ to 3” deep) put about a ¼ inch (about a 1/3 cup) of chicken or mushroom stock in the bottom and place this at the end of your “production line). Next, put some stock in the bottom of the skillet and put on low heat. When the stock starts to steam a little start taking your Bok Choy leaves, largest ones first, about 2 at a time and wilt them in the stock. This will only take a couple of minutes each turning once so that you get the other side.  Note: You do not want them too wilted or they will not hold the mixture during the baking process. After you have wilted the first two and have placed the second 2 in the skillet, spread the leaves on your working area stem side toward you and place about a couple of tablespoons worth of the mixture in the center.  Then, take the stem side and fold over top of the mixture so that the end is at the edge of the pile of mixture, next, fold each side to the center and finally take the far end and fold toward you. Take the completed packet and place with the smooth side up in the baking dish. Repeat, this process until you have a layer of packets along the bottom of the baking dish. Cover the baking dish with aluminum foil. Pre-heat the oven to 350 degrees and bake for 35 to 40 minutes.

Plating – I plated these 2 to 3 per person and allow each person to put the amount of chili sauce they desire on top.  I served this with a double helping of stir-fried vegetables.

Enjoy!

The Well Fed Cyclist

On the Edge…part deux

First, I have to apologize that I did not take a picture of the plate this time so I had to put a picture of “Mr. Grouper” from Bubble Guppies.  He’s kind of cute and is not quite something I would want to filet, his being a cartoon and all.  (And, please note that no cartoons were harmed while writing this blog post.)

The whole idea behind pre-diabetic cooking is to control the carbohydrate intake (you need about 30 grams per meal) and to make sure that you are getting the right kind of carbs for your diet. (think whole wheat, fruits and vegetables) I think this is one of the reasons that most of the literature points people in the direction of making sure that fruit is part of every meal. True a lot of fruits are full of sugar but the ones recommended for pre-diabetics and diabetics alike are berries. YUM! For any of you living near Maine or the New England area blueberries come to mind as the berry of choice along with your basic strawberries, raspberries and such. I have a high school classmate that said in our yearbook “Essence of blueberries is all you need to exist” and I would have to agree. So if you are cooking for a pre-diabetic make sure to include the berries, in their natural form of course.

This recipe was one of those thought up on a long ride one of these past weekends. For whatever reason, the leek and mushroom combination kept popping into my head which was kind of weird because before this time I had never cooked with leeks. (channeling a chef from the past maybe?) They are a fine vegetable, however, and are akin to very mild scallions only much bigger. I like this recipe because it is easy and the way that it is baked deep seats the flavors into the fish. So without further adieu here is the recipe. Later this week I will put out here the “how to” for the vegetable stock I made from the leftover parts of the leeks.

Glam Grouper
Grouper done with Leeks and Mushrooms
(Serves 4)

Ingredients:

3 – Large Grouper Fillets (mine totaled about 2.5 lbs)
4 – Leeks
2 pts – Mixed mushroom slices (if you cannot find these use a mushroom with a lot of earthy flavor like Portabellas or Cremini and mix them with Shitakes, Oyster and other flavorful mushrooms)
7 – Garlic cloves (fine diced)
1 – Handful fresh parsley (or a bit more, coarse chopped)
16 oz – Mushroom broth (you could also do vegetable stock but the mushroom broth gives a better flavor)
1 pinch – Sea Salt per fillet ( use coarse ground and only put 3 to 4 granules each)
Coarse ground Black Pepper (a couple of grinds per fillet)

Preparation:
Prepare the leeks (you are going to use the white parts) by cutting the white part off and slicing the long way into shreds. Wash between the leaves because a lot of dirt can get caught in there and I am pretty sure the grocery store has not washed them for you ahead of time. Save the green parts of the leeks to make vegetable soup stock.

Construction Instruction:
Spray the bottom of a 9 X 13 baking dish with a non-caloric cooking spray and arrange the fillets evenly across the dish. Pour in the mushroom broth so that it surrounds each of the fillets. Next, salt and pepper the fish and arrange leeks, mushrooms, garlic and parsley more around the fillets than on them. The reason for putting the ingredients around as opposed to on top is that you are going to steam cook the fillets and allow the fish to absorb those flavors. Tightly cover the baking dish with foil and bake at 375 degrees for about 40 minutes or until fish flakes easily.

This was served with a wild rice pilaf made with lightly sautéed mushrooms and sweet onions, roasted cauliflower and asparagus. On the side, there was also a berry salad with blueberries, raspberries, blackberries, strawberries and some kiwi for good measure.

Enjoy!
The Well Fed Cyclist

Penguin lust is a wonderful thing…

I loved Berkley Breathed’s cartoon Bloom County and was sad to see it go 25 years ago but I am very happy that it is back and just as good as before.  This recipe is named for Opus, the penguin character in this comic strip.  Here in Pittsburgh it is always misconstrued as misplaced support for the Pittsburgh Penguins hockey team.  I do like them but I like Opus much better. This recipe is one that has evolved over the past 20 years and has gotten better every year all by trial and, I won’t say error, but taste. I am surprised that I have not written anything about this recipe before now but I guess I was being a bit selfish. It started long ago in a galaxy far away when I was not impressed by the local Italian place’s eggplant parmesan and I thought I could do better.  I hope you like this version and if you are feeling “froggy” you can use sharp provolone to punch up the flavors.  Tomorrow is another adventure with the smoker this time with a brisket and the Texas rule of 3-2-1 for smoking the meat. I nhope it turns out okay.

Penguin Lust Eggplant Parmesan

Gary Bechard – The Well Fed Cyclist

4 – small to medium eggplant, skinned and sliced lengthwise into 1/8 inch thick slices (or for the metric geeks a little less than ½ cm) Sort these by size (I will explain later…Now, just do it)

1 to 2 packages – packaged, sliced mozzarella cheese

15 ounces – ricotta cheese (I use skim but, hey, if you want to use full it’s your waistline. I won’t judge)

Or

1 to 2 packages – sliced provolone cheese

Or You can mix and match!

4 – medium to large Portobello mushroom caps (deveined by taking the dark stuff under the cap), sliced thin, about 1/16 of an inch or about .25 cm

2 to 3 cups – whole wheat flour (you can use white if you want to but I find that whole wheat gives a richer flavor)

Note – I use my hand for measurement most times and very rarely use measuring devices. I kind of cup my hand and fill the hollow which is about 1 tablespoon.

3 palms full – dried parsley flakes (about 3 to 4 tablespoons)

2 palms full – dried basil flakes (about 2 to 3 tablespoons)

1 palm full – dried oregano flakes (about 1 to 2 tablespoons)

½ palm – garlic powder (you do not want to overdo this one if you want a kiss for your efforts later)

1 to 2 palms full – coarse ground black pepper (1 to 2 tablespoons)

5 – eggs, beaten

Extra Virgin Olive oil

Either 2 jars of your favorite spaghetti sauce OR, if your favorite sauce is your own homemade sauce, about 6 cups should do it

1 cup – shredded or grated parmesan cheese (I use a combination of pecorino Romano, parmesan and Asiago cheeses)

9 X 13 inch baking dish

Large non-stick skillet

Preparation:

Besides the slicing of the eggplant and mushrooms there is only one thing that you would have to do and that is to make your coating for the eggplant. In a large sealable plastic bag (1 gallon works best for me) dump in flour, parsley flakes, basil, oregano, garlic powder, parmesan cheese and pepper. Seal bag and shake to mix thoroughly. Set aside.

The Assembly Line:

What I normally do at this point (after all the slicing and mixing has been done) is create an assembly line for what are essentially limp, eggplant fritters (in a manner of speaking). The overall concept for the dish is to create individual stacks of eggplant parmesan. My set up (going from left to right) is stacks of eggplant slices, 5 eggs beaten, seasoned flour then the pan. On the other side of the pan, the 9 X 13 baking dish with the stacks of mozzarella, portabella mushroom slices, and ricotta or provolone slices (make sure you have a fork for the ricotta).

Let’s begin:

Pour half of your sauce in the bottom of the baking dish. Then take your trusty non-stick skillet and pour enough olive oil to slightly cover the bottom of the pan. Set the stove to medium low (5 to 6 on my stove you gas users are on your own, sorry) and allow the oil to come to temperature. (You should see a slight shimmer on the oil) Starting with the largest eggplant slices dip in the egg and then cover with flour. Place in skillet and cook until both sides are browned and eggplant slice is slightly limp. (I try to do 3 to 4 at a time). Once a set of slices are done, set each in the 9 X 13 dish as the base for the eggplant stacks. On top of the first layer place a layer of portabella mushroom slices. (You can start with a different ingredient but this is usually my first layer). Repeat the process for the second set of eggplant slices, place on top of the mushroom layer and layer on mozzarella cheese.

Special Note – After about two sets of eggplant slices the flour that falls off during the cooking process will start to burn slightly. I usually scrape the residue out of the pan with a silicone spatula and re-oil the pan so that the oil is clean for the next set of slices.

I continue the cooking and layering process with ricotta and then top with one final slice. You can make the stacks as high as you want but mine end up in this order:

Eggplant/mushroom/eggplant/mozzarella/eggplant/provolone/eggplant

Pour remaining sauce over the top of each stack and sprinkle parmesan, Romano, Asiago cheeses on top. Bake at 350 degrees for 35 to 40 minutes.

I like to have a nice salad or green beans cooked with pancetta or prosciutto. You should have a great Chianti on hand or (if you like white) a good Pinot Grigio to have with your eggplant.

Sometimes life gets in the way…

I would love to have this post be upbeat and funny but there are just some times that it just does not work out that way especially when you have a loved one in the hospital and they are not expected to leave. Unlike some folks, I love my in-laws as they have always been wonderful to me. My father in-law loved my cooking and I even created recipes for him.  He is one of the reasons that my recipes do not have a lot of added salt.  I will be thinking of a recipe which I will dedicate to him here when I have it completed. I want it to be a monument to his personality and one that will bring us all wonderful memories of a great man every time I make it. I love you Bill, even though out of respect I had a difficult time calling you that and see, I did take care of your daughter. In the interim, here is a post from the old site that was almost lost.  It is a very, very easy recipe but awfully delicious.

Desperate times call for…

Some of the best things can be born out of desperation and this recipe is an example of one of them. I was in charge of cooking dinner one night for me and the children but had not had any time to go to the grocery store to pick up anything specific. I knew I had chicken in the freezer (Who doesn’t?) but that was about it. I did not feel like serving the kids fast food because heaven knows that they will eat enough of that stuff in the course of their lives. So, I rooted around in the pantry and found a small jar of pineapple preserves and from the fridge a half bottle of teriyaki sauce and some soy sauce. I combined them together in this recipe which was so easy I recreated it with a pork tenderloin. (same steps and ingredients except for replacing chicken with pig)

Fast Hawaiian Chicken
(makes 4 servings)

Ingredients:
1 – Small, jar of pineapple preserves
½ a bottle or less of low sodium teriyaki sauce
1tsp – powdered ginger
1 tsp – coarse ground black pepper
2 tbsp – low sodium soy sauce
4 – Boneless, skinless chicken breasts
1tsp – dried basil leaves
1tsp – dried parsley flakes
Sesame seeds
¼ cup of peanut oil
9 X 13 baking dish

In a small bowl mix peanut oil, teriyaki sauce, soy sauce, parsley and basil and whisk together. Set this mixture aside for a moment. Spray baking dish with Pam or some other cooking spray and add about 1/4 cup of water to the bottom of the dish. You can even use rice wine as a liquid if you would like. (Less, if you are using a smaller pan or have reduced the recipe) Arrange chicken in the bottom of the pan and evenly sprinkle (distribute) ginger and black pepper over the top of each piece, kind of pressing the herbs into the chicken with your fingers. Take the teriyaki mixture which had been set aside and slowly pour over chicken. Spoon pineapple preserves evenly on each chicken breast so that each has its own layer. (It’s kind of like adding a blanket to each of the chicken breasts) You can add fresh pineapple slices around the outside of the chicken because it kind of looks nice (and tastes pretty good too when it’s done). Take sesame seeds and kind of “salt” them over top of everything before you put it in the oven.
Bake in an oven that has been pre-heated to 350 degrees for 40 minutes making sure to gently (you do not want to blast the pineapple from the top of the chicken) baste chicken about every 10 minutes with mixture from bottom of baking dish.

I served this with pineapple jasmine rice and green beans dressed with ginger salad dressing.

Enjoy!

There is a plot twist…

You would think that there is some nefarious murder mystery going on with the title and all but it is just about the food and as always, everything is about the food. And, I know, I know, I am flip flopping more than a politician during election season, and I even posted a fish recipe in the midst of what should have been “chicken week”  but I consider this recipe a kind of “two-fer” so possibly it could count for both? So, I guess, in a way, this entry is kind of a plot twist.

This was not a recipe born of desperation or the result of my CADD but was the result of figuring out what to do with a ¼ pound of 31 to 40 count shrimp. That amount of shrimp does not really make a meal for 2 people and is more annoying sitting in the freezer partially open than being used in a recipe. The way I thought of it is I figured that if the Japanese steak houses can serve hibachi chicken and shrimp together, I could combine the two in one easy to carry package (not that you would want to carry it but you could). It does not take a whole lot more effort than the Bay Watch chicken breasts but it does have a distinctly different flavor and you really do not need a sauce.

Shrimp Stuffed Chicken Breasts
Asian style
(makes 3-4 servings)

3-4 boneless, skinless chicken breasts
1/2 – Green bell pepper fine diced
1/2 (or less) – Red bell pepper fine diced
1/3 – sweet onion, fine diced
5 – Cloves garlic, fine diced
2 oz – Fresh chopped ginger root
1/4 lb – Shrimp, fine diced
4 – Shitake mushrooms fine diced
2 sticks – Celery fine diced
Coarse ground black pepper (to taste)
Small handful fine shredded fresh parsley (use dried if you must about 1 ½ tablespoons)
7 – Basil leaves fine chopped (use dried if you must about 1 ½ tablespoons)
Peanut or Canola oil
Soy Sauce and/or Teriyaki Sauce

Filling:
In a large skillet, cover bottom of pan with peanut or canola oil and over low/med heat sauté peppers, onion, garlic and celery until softened and onions become translucent. Add mushrooms and ginger root, sauté on low heat for about 2-3 minutes, season to taste with pepper. Add shrimp and go until the shrimp pieces turn pink, then season with teriyaki and soy sauce (remember that there is a lot of salt in those sauces so be sparing). After shrimp is done, add parsley and basil and keep on heat for another 2-3 minutes while mixing these ingredients in. Turn off heat and set aside to cool.
Stuffing it:
Take chicken breasts and, from the side, make a pocket by cutting the long way the entire length and almost all the way through (should look like a pita pocket). Take a spoon and stuff chicken with filling (do not overfill) enough so that edge can be closed with a toothpick, cooking string or skewers. Bake at 350 degrees for 35-45 minutes (add a bit of water or chicken stock to bottom of baking dish to keep moist).

This was served with sushi rice but can also be served with pineapple jasmine rice in addition to snow peas with mushrooms and almond slices. I also always serve a green salad with ginger dressing.

Enjoy!

Trust me officer “Baked” is a relative term…

I am sorry but yes, it is yet another fish recipe and this after I thought it was going to be “chicken week”. However this is a very easy recipe and won very high marks from one of my most discriminating critics (my daughter). The name of the recipe was kind of joke because nobody would EVER cook while they were fully baked…right? Not that I have ever been that way but I was just referring to the state of the fish at the end of the recipe…Yah, that’s the ticket. You believe me right? Okay, even if you do not believe me, this is still really good fish.

This recipe was born while I was watching chocolate chip cookies being made at the same time I was trying to figure out how to make faux fried fish for dinner. I think I was watching Alton Brown on the Food Network, but that is neither here nor there, and as I was watching the vanilla extract being added to the cookie batter (after Alton’s requisite aside on actual vanilla beans, where they come from, how they grow, what we do with them, etc.) I wondered how it would taste on breadcrumbs and ultimately the fish. I quickly made a crumb test batch to try out on my family first. The test was a success and the rest, as they say, is history. The best thing about grouper is that it takes on virtually any flavor you put on it and the better the outside flavor the better the fish. I know that grouper is expensive right now but if you get the chance you should try this recipe. Haddock or most any other mild, flaky white fish would also work.

I’m Totally Baked
Vanilla Grouper
(makes 4 – 5 servings)

2 ½ lbs – Grouper fillets (skinless, about 8 ounces per person)
1 ½ cups – Canola Oil
1 ounce – Pure vanilla extract
1 1/2 tsp – Sugar
7 ounce package – Panko breadcrumbs

Combine canola oil, vanilla extract and sugar in a medium bowl and whisk together thoroughly and set aside (for now). Next, in a big ass skillet, pour about half of the oil/vanilla mixture in the bottom and start it on low heat. After about 2 to 3 minutes of letting the oil/vanilla mixture heat up add about 1/3 of the breadcrumbs and mix together until the breadcrumbs absorb the oil. Repeat this same process until you have run out of breadcrumbs and the oil/vanilla mixture. Move the heat to just below medium and toast the breadcrumbs for approximately 3 to 5 minutes, then lower heat and toast some more at low for another 2 to 3 minutes. After this remove the breadcrumbs from the heat and set aside to cool.

After the breadcrumbs have cooled a bit, wet grouper fillets (I did it with water but you can also use buttermilk but if you do I would soak the fillets for the entire time you are making the breadcrumbs) and roll them in the mixture fully coating them. Spray the bottom of a 9 X 13 baking dish with a non-caloric cooking spray and arrange the fillets in the bottom of the pan. Bake the fish at 380 to 400 degrees for about 35 minutes or until the fish starts to flake easily. The breadcrumbs should have a “toasted marshmallowesque” look to them. (I always start checking my fish at the 30 minute mark because sometimes fillets can be of different thicknesses and the thinner ones take less time. You do not want to overcook them.)

I served this with steamed fresh green beans garnished with almond slices and wild rice pilaf with Cremini mushrooms and petite peas.

Enjoy!